Difference between revisions of "Sensor Board Programming"
From University of Washington - Ubicomp Research Page
m |
m |
||
| Line 10: | Line 10: | ||
# Convert the hexadecimal number to decimal | # Convert the hexadecimal number to decimal | ||
# Program the converted value into the persistent store keys | # Program the converted value into the persistent store keys | ||
| + | |||
=== Setting up the Spectrum Analyzer === | === Setting up the Spectrum Analyzer === | ||
<ul> | <ul> | ||
| − | [[image:SpectrumAnalyzerSetup.png| | + | [[image:SpectrumAnalyzerSetup.png|500px|thumb|right]] |
Any 2.4GHz spectrum analyzer will work the only requirement is it being somewhat calibrated and having an appropriate 2.4GHz antenna. The instructions below are for using a Tekntronix RSA3408A 8GHz digital spectrum analyzer. Here are the steps to setup the spectrum analyzer so you can tune the radio: | Any 2.4GHz spectrum analyzer will work the only requirement is it being somewhat calibrated and having an appropriate 2.4GHz antenna. The instructions below are for using a Tekntronix RSA3408A 8GHz digital spectrum analyzer. Here are the steps to setup the spectrum analyzer so you can tune the radio: | ||
# With the spectrum analyzer off, plug in the 2.4GHz antenna. | # With the spectrum analyzer off, plug in the 2.4GHz antenna. | ||
| Line 26: | Line 27: | ||
# And hit the "kHz" button to indicate a span of 400kHz, in general all the Bluetooth radios should transmit within this span but you can set it lower or higher if needed | # And hit the "kHz" button to indicate a span of 400kHz, in general all the Bluetooth radios should transmit within this span but you can set it lower or higher if needed | ||
# Once the radio is transmitting there should be a single peak like the one shown in the figure. By default the purple cursor (seen as a small box on the right side of the peak in the picture) will point to our desired center frequency of 2.441GHz. If you want you can hit the "peak" button to have the cursor highlight what frequency the highest peak is at. In general its better to leave the cursor at 2.441GHz so you don't end up using the wrong center frequency by mistake. You can reset the cursor by entering 2.441GHz in the keypad. | # Once the radio is transmitting there should be a single peak like the one shown in the figure. By default the purple cursor (seen as a small box on the right side of the peak in the picture) will point to our desired center frequency of 2.441GHz. If you want you can hit the "peak" button to have the cursor highlight what frequency the highest peak is at. In general its better to leave the cursor at 2.441GHz so you don't end up using the wrong center frequency by mistake. You can reset the cursor by entering 2.441GHz in the keypad. | ||
| + | <br style="clear:both;"/> | ||
</ul> | </ul> | ||
| + | |||
=== Using BlueTest to get the crystal trim value === | === Using BlueTest to get the crystal trim value === | ||
| Line 34: | Line 37: | ||
# Once you hit ok the software will attempt to communicate with the BlueCore chip, if it fails the software may exit or display an error message. If this happens be sure to check all your connections and ensure that the chip is powered and fully seated in the development board. If the software is able to communicate with the BlueCore chip than the firmware version will be displayed in the bottom console (something similar to 'BC3 (Hardware ID 43) firmware version 4290.' | # Once you hit ok the software will attempt to communicate with the BlueCore chip, if it fails the software may exit or display an error message. If this happens be sure to check all your connections and ensure that the chip is powered and fully seated in the development board. If the software is able to communicate with the BlueCore chip than the firmware version will be displayed in the bottom console (something similar to 'BC3 (Hardware ID 43) firmware version 4290.' | ||
# Once the BlueTest software is up and running we'll first send a command to the BlueCore to have it transmit a carrier wave at 2.441GHz, scroll the "RF Test Modes" box to the "TXSTART" entry and select 'Execute'. At this point a peak should appear on the spectrum analyzer assuming its setup correctly. | # Once the BlueTest software is up and running we'll first send a command to the BlueCore to have it transmit a carrier wave at 2.441GHz, scroll the "RF Test Modes" box to the "TXSTART" entry and select 'Execute'. At this point a peak should appear on the spectrum analyzer assuming its setup correctly. | ||
| − | # With the carrier wave being transmitted we can now tune our crystals settings, to do this we scroll the "RF Test Modes" box to the "CFG XTAL FTRIM" entry and hit execute. So long as we don't do anything else the BlueCore should continue to transmit its 2.441GHz signal so we don't have to set the crystal trim and then execute the TXSTART, it should always be transmitting. Now, we can tune our crystal trim value until the spectrum analyzer shows the peak centered at 2.441GHz. The trim value used here is in hexadecimal so be sure to use the appropriate number when stepping the trim value up and down. After finding the number, write it down and we will have to program the value into the BlueCore using the | + | # With the carrier wave being transmitted we can now tune our crystals settings, to do this we scroll the "RF Test Modes" box to the "CFG XTAL FTRIM" entry and hit execute. So long as we don't do anything else the BlueCore should continue to transmit its 2.441GHz signal so we don't have to set the crystal trim and then execute the TXSTART, it should always be transmitting. Now, we can tune our crystal trim value until the spectrum analyzer shows the peak centered at 2.441GHz. The trim value used here is in hexadecimal so be sure to use the appropriate number when stepping the trim value up and down. After finding the number, write it down and we will have to program the value into the BlueCore using the PSTool. |
<ul> | <ul> | ||
| − | [[image:BlueTest3_SelectTransport.png|222px|thumb|left|Select the H4 Transport, | + | [[image:BlueTest3_SelectTransport.png|222px|thumb|left|Select the H4 Transport, the first serial port installed by the FTDI driver, and 921600 baud]] |
| − | [[image:BlueTest3_default.png|thumb|left|If the BlueTest software has successfully communicated with the chip it will show the chip ID and firmware version]] | + | [[image:BlueTest3_default.png|300px|thumb|left|If the BlueTest software has successfully communicated with the chip it will show the chip ID and firmware version]] |
| − | [[image:BlueTest3_tx_start.png|thumb|left|We use the default TXSTART settings to transmit a 2.441GHz carrier wave]] | + | [[image:BlueTest3_tx_start.png|300px|thumb|left|We use the default TXSTART settings to transmit a 2.441GHz carrier wave]] |
| − | [[image:BlueTest3_xtal_trim.png|thumb|left|Moving the value up should move our center frequency up (to the right) and moving the value down should move the center frequency down (to the left)]] | + | [[image:BlueTest3_xtal_trim.png|300px|thumb|left|Moving the value up should move our center frequency up (to the right) and moving the value down should move the center frequency down (to the left)]] |
</ul><br style="clear:both;"/> | </ul><br style="clear:both;"/> | ||
</ul> | </ul> | ||
| Line 82: | Line 85: | ||
| 0x1F || 31 || 0x2F || 47 || 0x3F || 63 | | 0x1F || 31 || 0x2F || 47 || 0x3F || 63 | ||
|} | |} | ||
| + | </ul> | ||
| + | |||
| + | |||
| + | === Setting the Crystal Trim in the Persistent Store Keys === | ||
| + | <ul> | ||
| + | Once we've figured out the appropriate crystal frequency trim value, we need to set this value in the chips on-board flash so it uses it each time it boots. To do this we use the PSTool program, which we can access via the serial port: | ||
| + | # Even though the interface is slightly different we choose the same settings for the PSTool that we did for the BlueTest software, H4 Transport, the first serial port installed by our USB driver, and 921,600 baud. | ||
| + | # Scroll to the "Crystal frequency trim" setting (or use the filter) and set the <b>decimal</b> value of the <b>hexadecimal</b> number found using BlueTest. You can use the above table to make the conversion quicker | ||
| + | <ul> | ||
| + | [[image:PSTool_Transport.png|300px|thumb|left|Select the H4 Transport, the first serial port installed by the FTDI driver, and 921600 baud]] | ||
| + | [[image:PSTool_crystal_trim.png|300px|thumb|left|Set the <b>decimal</b> value of the <b>hexadecimal</b> number found using BlueTest]] | ||
| + | </ul><br style="clear:both;"/> | ||
</ul> | </ul> | ||
Revision as of 04:26, 8 March 2007
Contents
Tuning the Bluetooth Radio
Each BlueCore3 baseband is self calibrated according to the ambient/chip temperature and the input clock. Since the chip takes care of tuning the temperature we just need to set the appropriate tweaking for the crystal, this is set by:
- the BlueCore radio broadcast an RF signal at what it believes 2.441GHz
- a spectrum analyzer set to 2.441GHz scanning the RF spectrum for this signal
- a crystal trim value that adjusts the BlueCore's signal until it outputs a true 2.441Ghz signal
The basic process is:
- Program the firmware and persistent store keys on the Bluetooth radio
- Determine the crystal trim value (in hexadecimal) using a spectrum analyzer
- Convert the hexadecimal number to decimal
- Program the converted value into the persistent store keys
Setting up the Spectrum Analyzer
- With the spectrum analyzer off, plug in the 2.4GHz antenna.
- This should require no force and doesn’t have to be very tight, be careful to not bend or break any of the delicate leads
- Turn on the spectrum analyzer it will boot into Window sXP and after a few moments will start the spectrum analyzer software.
- It is generally a good idea to leave the system running for about 15minutes before you use it so the device has a chance to warm up and calibrate itself.
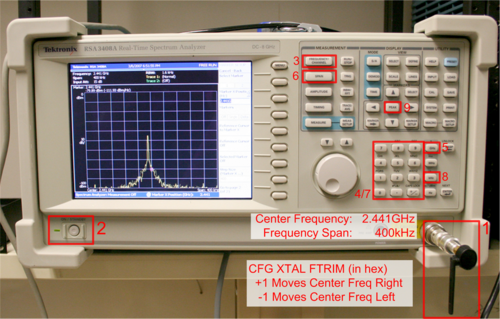
- First we set the center frequency, by hitting button 3
- Enter "2.441" on the keypad
- Hit the "GHz" button to indicate that its 2.441GHz
- Next we set the span (how wide the visible spectrum is) by hitting button 6
- Then we enter "400" on the keyboard
- And hit the "kHz" button to indicate a span of 400kHz, in general all the Bluetooth radios should transmit within this span but you can set it lower or higher if needed
- Once the radio is transmitting there should be a single peak like the one shown in the figure. By default the purple cursor (seen as a small box on the right side of the peak in the picture) will point to our desired center frequency of 2.441GHz. If you want you can hit the "peak" button to have the cursor highlight what frequency the highest peak is at. In general its better to leave the cursor at 2.441GHz so you don't end up using the wrong center frequency by mistake. You can reset the cursor by entering 2.441GHz in the keypad.
Any 2.4GHz spectrum analyzer will work the only requirement is it being somewhat calibrated and having an appropriate 2.4GHz antenna. The instructions below are for using a Tekntronix RSA3408A 8GHz digital spectrum analyzer. Here are the steps to setup the spectrum analyzer so you can tune the radio:
Using BlueTest to get the crystal trim value
-
To get the radio to emit a 2.441GHz carrier wave for the spectrum analyzer we need to use the BlueTest3 software to access the Bluetooth radio's RF test modes. We do this with the BlueTest3 program (BlueTest3.exe) which can communicate with the BlueCore chip via the serial port of the SPI interface. To setup the RF test mode and find the right crystal trim values we need to do the following:
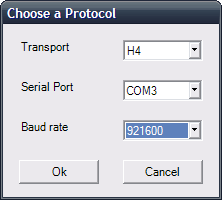
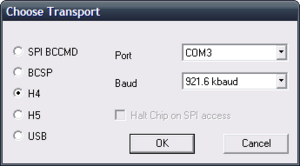
- Start the software and select the H4 transport, the appropriate serial port (this will be the COM number of the first USB Serial port installed by the development board), and the 921,600 baud rate.
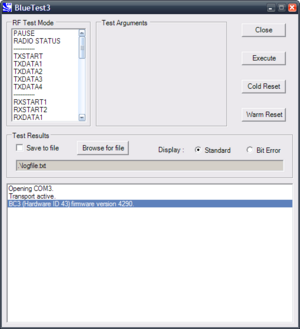
- Once you hit ok the software will attempt to communicate with the BlueCore chip, if it fails the software may exit or display an error message. If this happens be sure to check all your connections and ensure that the chip is powered and fully seated in the development board. If the software is able to communicate with the BlueCore chip than the firmware version will be displayed in the bottom console (something similar to 'BC3 (Hardware ID 43) firmware version 4290.'
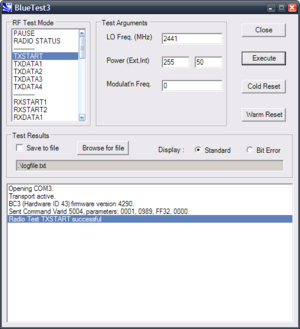
- Once the BlueTest software is up and running we'll first send a command to the BlueCore to have it transmit a carrier wave at 2.441GHz, scroll the "RF Test Modes" box to the "TXSTART" entry and select 'Execute'. At this point a peak should appear on the spectrum analyzer assuming its setup correctly.
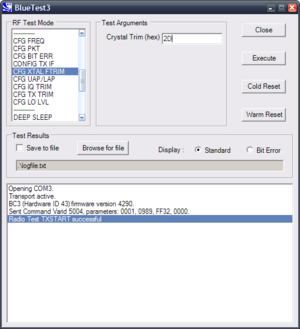
- With the carrier wave being transmitted we can now tune our crystals settings, to do this we scroll the "RF Test Modes" box to the "CFG XTAL FTRIM" entry and hit execute. So long as we don't do anything else the BlueCore should continue to transmit its 2.441GHz signal so we don't have to set the crystal trim and then execute the TXSTART, it should always be transmitting. Now, we can tune our crystal trim value until the spectrum analyzer shows the peak centered at 2.441GHz. The trim value used here is in hexadecimal so be sure to use the appropriate number when stepping the trim value up and down. After finding the number, write it down and we will have to program the value into the BlueCore using the PSTool.
Hexadecimal to Decimal Table
-
The CFG XTAL FTRIM value is set in hexadecimal, however, the "Crystal Frequency Trim" value is set in decimal. Here's a quick look up table for mapping from hexadecimal to decimal:
| Hexadecimal | Decimal | Hexadecimal | Decimal | Hexadecimal | Decimal |
|---|---|---|---|---|---|
| 0x10 | 16 | 0x20 | 32 | 0x30 | 48 |
| 0x11 | 17 | 0x21 | 33 | 0x31 | 49 |
| 0x12 | 18 | 0x22 | 34 | 0x32 | 50 |
| 0x13 | 19 | 0x23 | 35 | 0x33 | 51 |
| 0x14 | 20 | 0x24 | 36 | 0x34 | 52 |
| 0x15 | 21 | 0x25 | 37 | 0x35 | 53 |
| 0x16 | 22 | 0x26 | 38 | 0x36 | 54 |
| 0x17 | 23 | 0x27 | 39 | 0x37 | 55 |
| 0x18 | 24 | 0x28 | 40 | 0x38 | 56 |
| 0x19 | 25 | 0x29 | 41 | 0x39 | 57 |
| 0x1A | 26 | 0x2A | 42 | 0x3A | 58 |
| 0x1B | 27 | 0x2B | 43 | 0x3B | 59 |
| 0x1C | 28 | 0x2C | 44 | 0x3C | 60 |
| 0x1D | 29 | 0x2D | 45 | 0x3D | 61 |
| 0x1E | 30 | 0x2E | 46 | 0x3E | 62 |
| 0x1F | 31 | 0x2F | 47 | 0x3F | 63 |
Setting the Crystal Trim in the Persistent Store Keys
-
Once we've figured out the appropriate crystal frequency trim value, we need to set this value in the chips on-board flash so it uses it each time it boots. To do this we use the PSTool program, which we can access via the serial port:
- Even though the interface is slightly different we choose the same settings for the PSTool that we did for the BlueTest software, H4 Transport, the first serial port installed by our USB driver, and 921,600 baud.
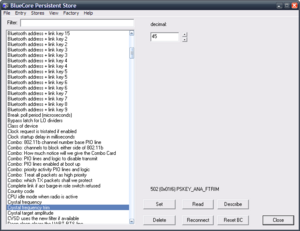
- Scroll to the "Crystal frequency trim" setting (or use the filter) and set the decimal value of the hexadecimal number found using BlueTest. You can use the above table to make the conversion quicker
